 |
|
 04-24-2016, 04:07 AM
|
#1
|
|
Senior Member
Join Date: Jan 2014
Location: Winnipeg, Canada
Posts: 1,196
|
MorRyde Wet Bolt Kit Install
When we returned from our 7,000 mile trip last fall, the TT was creaking. With close to 15,000 miles total on the TT in 1 1/2 seasons, I decided to install a wet bolt kit from MorRyde.
If you want to be spared my commentary and want to get a picture only overview, go to this album: http://www.keystonerv.org/forums/album.php?albumid=756
PART 1:
When inspecting the suspension, I notice some nylon material sticking out at one of the spring hangers.

That confirmed my suspicion that our travels had worn out the bushings. Although Dexter had wet bolt kits, none seemed to have all the components I required in one kit, where as MorRyde did have what I needed.

The components in the tandem axle U012-016 kit:

Based on review of other wet bolt kit installation posts, it was highly recommended by others to use a ball joint or u joint press from Harbor Frieght. I purchased a U joint press from Princess Auto on sale since I am in Canada. Another option would have been to use the free tool rental at Canadian Tire. Note that the ball joint press has accessories, none of which are required for the wet bolt kit install. So the cheaper u joint press is the best option.

__________________
2018 Jayco Eagle HT 265BHS (previous: 2015 23RB Passport Elite, ProPride)
2015 F250 XLT SB Crew, 6.2l gas
PullRite 16K SuperGlide w/SuperRail
Reese 5th Airborne (bagged) Pin Box
RoadMaster Shock Kit
X-Factor Cross Bracing
|

|

|
|
04-24-2016, 04:22 AM
|
#2
|
|
Senior Member
Join Date: Jan 2014
Location: Winnipeg, Canada
Posts: 1,196
|
PART 2:
One challenge I had was the 5 degree slope of my driveway. I therefore decided that I would do one side of the TT at a time with the TT on the ball of the TV. Although I had rubber chocks that I use with the TT, I purchased larger rubber chocks to use with the TV, just to be safer.
The devices I used to support the TT included a couple of unijacks that have the jack stand integrated into the bottle jack, wood blocking and 2 additional bottle jacks. I also made a couple of blocks with a 1 1/2 radius cutout so they would fit up against the axle between the u bolts. Regular jack stands instead of the unijacks would also work, but may require shimming to fine tune the heights.

I used the tongue jack to lift the TT (slightly) so the suspension's equalizer was close to being parallel to the TT frame. Then I set up the blocking and unijacks so that they just contacted the bottom of the frame rails (no lifting) while the TT was still resting on the tires/wheels. This way I would not be lifting the TT but rather keeping it at the same height as when all 4 tires are down. To remove the wheels, I jacked each bottle jack placed under each axle one at a time just enough to remove the wheel. After lowering the bottle jacks under the axles, the frame was supported by the unijacks.

This is what the suspension looked like before I started dismantling it.


__________________
2018 Jayco Eagle HT 265BHS (previous: 2015 23RB Passport Elite, ProPride)
2015 F250 XLT SB Crew, 6.2l gas
PullRite 16K SuperGlide w/SuperRail
Reese 5th Airborne (bagged) Pin Box
RoadMaster Shock Kit
X-Factor Cross Bracing
|
|
|
|
|
04-24-2016, 04:45 AM
|
#3
|
|
Senior Member
Join Date: Jan 2014
Location: Winnipeg, Canada
Posts: 1,196
|
PART 3:
I decided to tackle the front and rear spring end bolts/bushings first. (That turned out to be the right approach when it was time to dismantle the equalizer bolts/bushings.)
The first step was to remove the flanged nut from the suspension bolt while using a wrench on the head of the bolt to prevent the bolt from turning and damaging the hanger by the bolt's serrations. With the nut off, but the bolt still in place, I raised / lowered the bottle jack under the axle the spring was attached to until the spring felt loose at the bolt I was removing. I then used the u joint press to press out the bolt.

With the bolt removed, I lowered the bottle jack so the spring eye was visible.

The first bolt that I removed turned out to have the nylon bushing with some of the most wear. That made it easy to remove the bushing from the spring eye.

To remove the bushings that were not as worn, I found that my 12 mm deep 3/8 drive socket was the perfect diameter to drive out the nylon bushings with a hammer.
I cleaned out the bore of the spring eyes with a small wire brush (battery terminal clamp brush). I pre-greased the bore of the bushing and then inserted a brass bushing in the spring eye and raised the axle with the bottle jack to align the center of the bushing with the hanger hole.
MorRyde and Dexter recommend that the cross hole in the wet bolts be orientated on the horizontal axis (9 and 3 o'clock positions) when installed. I decided to install mine with the cross holes as shown by the red dots. The one exception I made was with the center top equalizer bolt.

I had previously prepped all bolts by deburring the cross hole and outside surfaces since they had nicks in them. I also removed the grease fittings and cleaned out the bored centers with brake cleaner and compressed air to be sure there was no debris. I then pre-greased the wet bots to ensure they would take grease. In other posts, some installers have filed a longitudinal groove in the wet bolt. I decided not to since there is ample clearance between the bushing and bolt for grease to flow.
__________________
2018 Jayco Eagle HT 265BHS (previous: 2015 23RB Passport Elite, ProPride)
2015 F250 XLT SB Crew, 6.2l gas
PullRite 16K SuperGlide w/SuperRail
Reese 5th Airborne (bagged) Pin Box
RoadMaster Shock Kit
X-Factor Cross Bracing
|
|
|
|
|
04-24-2016, 05:03 AM
|
#4
|
|
Senior Member
Join Date: Jan 2014
Location: Winnipeg, Canada
Posts: 1,196
|
PART 4:
Prior to inserting the wet bolt, I applied grease to the outside diameter and I adjusted the bottle jack under the axle so the hanger and bushing aligned vertically. In a couple of cases, they were not aligned horizontally, but it was easy to just push the axle to get alignment.
Next I inserted the wet bolt being careful to have the grease cross hole orientated in the desired direction. Note that I decided to orientate the bolt so the grease fitting was pointed toward the center of the trailer and the nut would be outside. That will make it "easier" to grease without having to remove the wheels, but will mean crawling under the TT.
Using a socket that fit the grease fitting, I used the u joint press to seat the head of the bolt tightly up against the hanger.
(Note: I shimmed the unijack so it was not loading the propane gas line.)

The nut was then torqued to 50 ft-lbs while holding the head of the bolt to prevent it from turning and damaging the hangers by the serrations.
TIP: The bottle jack should remain in the position you just used to align the spring eye and hanger holes. It will make the wet bolt replacement at the equalizer much easier later.
Before moving on and repeating the above procedure on the other spring eye to hanger bolts, I shot grease into the wet bolts I had just installed while under no load.
__________________
2018 Jayco Eagle HT 265BHS (previous: 2015 23RB Passport Elite, ProPride)
2015 F250 XLT SB Crew, 6.2l gas
PullRite 16K SuperGlide w/SuperRail
Reese 5th Airborne (bagged) Pin Box
RoadMaster Shock Kit
X-Factor Cross Bracing
|
|
|
|
|
04-24-2016, 05:09 AM
|
#5
|
|
Senior Member
Join Date: Jan 2012
Location: Central San Joaguin Valley, CA
Posts: 2,117
|
Well organized post. Great photos and description. Thanks for sharing.
Your info should be very helpful to anyone performing this mod on their trailer.
__________________

Jack & Marty
2018 Laredo 298 SRL
2011 F-250 SB Crew Cab 4x4 6.7L
|
|
|
|
|
04-24-2016, 05:12 AM
|
#6
|
|
Senior Member
Join Date: Jan 2014
Location: Winnipeg, Canada
Posts: 1,196
|
PART 5:
After completing both the front and rear most hanger to spring eye wet bolts, the equalizer was next.
With the bottle jacks still supporting the axles at the previous heights that made the insertion of the wet bolts easy, the top center equalizer to hanger bolt is easily removed without having to support the equalizer.

Next I removed the shackle assemblies from the equalizer and springs. That allowed me to work on the equalizer on a table since the removal of the nylon bushings and installation of the brass bushings were more challenging. More on that in the next post.
I was surprised with the amount of wear of the factory installed nylon bushings. Turned out that 10 of 14 bushings were so worn that IMO they were not acceptable for continued use.
Driver side:

Passenger side:

In general terms, the bushings with the most wear were at the front and rear most hangers (due to spring eye shape) and the top equalizer hanger (due to load) locations. Next most significant was the bushings in the spring eyes at the shackles (due to spring eye shape). The four least worn bushings were at the shackle to equalizer connection probably because of the lower load they carry and a better hole in the equalizer than in a spring eye.
__________________
2018 Jayco Eagle HT 265BHS (previous: 2015 23RB Passport Elite, ProPride)
2015 F250 XLT SB Crew, 6.2l gas
PullRite 16K SuperGlide w/SuperRail
Reese 5th Airborne (bagged) Pin Box
RoadMaster Shock Kit
X-Factor Cross Bracing
|
|
|
|
|
04-24-2016, 05:13 AM
|
#7
|
|
Senior Member
Join Date: Jan 2014
Location: Winnipeg, Canada
Posts: 1,196
|
PART 6:
With the equalizer off the TT, I used the 12 mm deep socket to drive out the nylon bushings. These were the most stubborn to remove and the socket made it much easier.
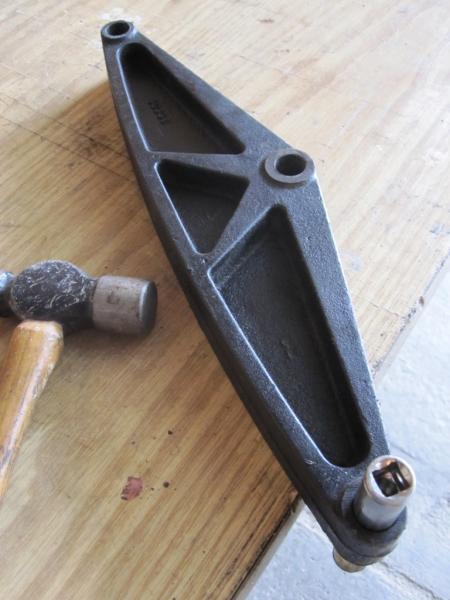
With the nylon bushings removed from the equalizer, I used 220 grit sandpaper wrapped around a 1/2 diameter rod to clean out the holes in the equalizer.
The brass bushings were a tight fit into the equalizer. I used an old shackle bolt that I ground off the serrations on to drive the brass bushings into the equalizer. By doing so, I minimised deformation of the ends of the brass bushing.


The inside diameter of a couple of the equalizer brass bushings needed to be reamed out after installation to ensure the wet bolt did not fit too tight in the bushing. In hind sight, I should have reamed out the holes in the equalizer prior to installing the brass bushings. That way I would have had a chance to have had a more consistent fit without the loss in thickness of the thin walled brass bushing.
__________________
2018 Jayco Eagle HT 265BHS (previous: 2015 23RB Passport Elite, ProPride)
2015 F250 XLT SB Crew, 6.2l gas
PullRite 16K SuperGlide w/SuperRail
Reese 5th Airborne (bagged) Pin Box
RoadMaster Shock Kit
X-Factor Cross Bracing
|
|
|
|
|
04-24-2016, 05:14 AM
|
#8
|
|
Senior Member
Join Date: Jan 2014
Location: Winnipeg, Canada
Posts: 1,196
|
MorRyde Wet Bolt Kit Install
PART 7:
Once the equalizer bushings were installed (and the ID reamed where required), the bushings were pre-greased. Then the equalizer was reinstalled onto the hanger with a wiped on pre-greased wet bolt. The wet bolt was pressed into the hanger using the u joint clamp as was done for the front and rear spring hangers and torqued to 50 ft-lb.
Next the shackles were installed between the spring and equalizer on both sides. Since the wet bolts were already pressed into the shackles at the factory, this was a simple assembly of components (no need to use the u joint clamp). After torquing the shackle nut while holding the wet bolt with a wrench to 50 ft-lbs, I used touch up paint to give me a visual indicator for any loosening of the nut in the future. I also used a grease gun to lubricate the welt bolts while the suspension was in an unloaded condition.

The end result for the driver side:


I then raised each bottle jack one at a time just enough to re-install each wheel. With both wheels installed, I removed the unijacks before lowering the axle bottle jacks so the tires were back on the ground. With the tires back on the ground and all the lifting devices moved out of the way, I re-greased all the fittings to ensure they all still took grease when loaded.
The above procedure was repeated on the curb side of the TT.
__________________
2018 Jayco Eagle HT 265BHS (previous: 2015 23RB Passport Elite, ProPride)
2015 F250 XLT SB Crew, 6.2l gas
PullRite 16K SuperGlide w/SuperRail
Reese 5th Airborne (bagged) Pin Box
RoadMaster Shock Kit
X-Factor Cross Bracing
|
|
|
|
|
04-24-2016, 05:14 AM
|
#9
|
|
Senior Member
Join Date: Jan 2014
Location: Winnipeg, Canada
Posts: 1,196
|
PART 8:
A few observation and comments:
* Our TT wheels have been balanced for most of it's life and it has never been on a gravel road other than at slow speeds in a campground. But it has seen rough paved roads that seem to be the norm these days and experienced extended duration wet road conditions on cross country trips.
* The task of upgrading to wet bolts is not that difficult for a DIY. Working myself, it took approximately 6 hours from the time I started lifting the TT, to having all the wheels back on the TT. This is the first time I installed a wet bolt kit or lifted the whole side of our TT. The most time consuming aspect is the preparation and ensuring the TT is safe to work under when elevated.
* The wet bolt kit's brass bushings were a very loose fit in the spring eyes, while very tight in the equalizer. Both may contribute to future durability of the wet bolt setup IMO.
* The use of thin walled nylon bushings is a disappointment from two perspectives IMO. First, it is obvious that they are not appropriate for the application. Second, their use limits how effective a modification such as a wet bolt kit will be because of their small component diameters.
* The use of a thin wall nylon tube, means that the wet bolt kit can only use a thin wall brass bushing. Although I suspect the brass bushing will be somewhat more durable than the nylon, the brass bushing will IMO require regular replacement as well.
* A superior leaf spring pivot point design would use larger diameter shackle bolt diameters and thicker wall bushings thereby requiring larger diameter spring eyes. Compare the rear leaf suspension on your TV vs. that of your TT. No comparison, but both carry similar loads.
Despite these disappointments, I am glad I took the time to install the wet bolt kit PRIOR to damaging mating components that would have resulted in additional expense.
Now that I have this project under my belt, a future project may be to install the wide axle cushioned equalizer (LC257486) from Lippert. But that will wait for when I am replacing the brass bushings in a few years, LOL.
I hope this helps those contemplating a wet bot kit upgrade.
__________________
2018 Jayco Eagle HT 265BHS (previous: 2015 23RB Passport Elite, ProPride)
2015 F250 XLT SB Crew, 6.2l gas
PullRite 16K SuperGlide w/SuperRail
Reese 5th Airborne (bagged) Pin Box
RoadMaster Shock Kit
X-Factor Cross Bracing
|
|
|
|
|
04-24-2016, 07:06 AM
|
#10
|
|
Senior Member
Join Date: Jan 2014
Location: Winnipeg, Canada
Posts: 1,196
|
Quote:
Originally Posted by jsmith948

Well organized post. Great photos and description. Thanks for sharing.
Your info should be very helpful to anyone performing this mod on their trailer.
|
Thanks Jack.
My objective was to share what I learned from posts I have studied on this and other forums, as well as my own experience. Some of the best installation posts IMO, are now relatively old. More recent posts on the topic suggest doing searches and those oldies are buried and getting harder to find using Google.
Also, there seems to be some debate as to whether the wet bolt kit is required for lighter trailers. My experience with a relatively new lightweight TT with about 7,500 miles per season suggests suspension bushings definitely require our attention.
__________________
2018 Jayco Eagle HT 265BHS (previous: 2015 23RB Passport Elite, ProPride)
2015 F250 XLT SB Crew, 6.2l gas
PullRite 16K SuperGlide w/SuperRail
Reese 5th Airborne (bagged) Pin Box
RoadMaster Shock Kit
X-Factor Cross Bracing
|
|
|
|
|
04-24-2016, 08:26 AM
|
#11
|
|
Senior Member
Join Date: Jul 2014
Location: Solomons
Posts: 3,874
|
Great group of post. I appreciate all the details and pictures. I'm pretty sure the wet bolt modification will be in our future some day.
__________________
Tom
2019 Alpine 3651RL
2016 F350 CC DRW
|
|
|
|
|
04-24-2016, 10:43 AM
|
#12
|
|
Senior Member
Join Date: Jan 2014
Posts: 487
|
Excellent documentation job!
__________________
Pilot for fun, Computer geek for a living, and happy 5er owner who wants more time to go play in the camper!
|
|
|
|
|
04-24-2016, 09:24 PM
|
#13
|
|
Senior Member
Join Date: Apr 2013
Location: Beaverton
Posts: 309
|
You have went to a great deal of trouble to pass on information that many of us will use. Thank you very much for taking the time to share! Its people like you that make this Forum great!
__________________
2012 Cougar TT, 24RKSWE, 27'
2012 Tundra 4.6V8, 2wd, dbl cab
|
|
|
|
|
04-28-2016, 11:35 AM
|
#14
|
|
Senior Member
Join Date: Aug 2014
Location: Lincoln, NE
Posts: 422
|
What a great set of posts. Thanks. That same job is on my agenda for next month.
|
|
|
|
|
04-28-2016, 03:16 PM
|
#15
|
|
Senior Member
Join Date: Oct 2010
Location: Okanagan, BC
Posts: 916
|
Somehow I lol'd at the "I purchased a U joint press from Princess Auto on sale since I am in Canada. Another option would have been to use the free tool rental at Canadian Tire."
You sound like me  
__________________
2010 Cougar 30RKS
2015 GMC Sierra Max Trailer
"Drinks for 6, Dinner for 4, Sleeps 2"
|
|
|
|
|
04-28-2016, 07:16 PM
|
#16
|
|
Senior Member
Join Date: Jan 2014
Location: Winnipeg, Canada
Posts: 1,196
|
Quote:
Originally Posted by GMcKenzie
Somehow I lol'd at the "I purchased a U joint press from Princess Auto on sale since I am in Canada. Another option would have been to use the free tool rental at Canadian Tire."
You sound like me |
Got to have my own, even if I only use it once, LOL.
__________________
2018 Jayco Eagle HT 265BHS (previous: 2015 23RB Passport Elite, ProPride)
2015 F250 XLT SB Crew, 6.2l gas
PullRite 16K SuperGlide w/SuperRail
Reese 5th Airborne (bagged) Pin Box
RoadMaster Shock Kit
X-Factor Cross Bracing
|
|
|
|
|
04-28-2016, 07:18 PM
|
#17
|
|
Senior Member
Join Date: Jan 2014
Location: Winnipeg, Canada
Posts: 1,196
|
Quote:
Originally Posted by cardinal96ss
What a great set of posts. Thanks. That same job is on my agenda for next month.
|
I look forward to hear how the upgrade works out for you and what you find. I hope it goes smoothly for you as it did for me..
__________________
2018 Jayco Eagle HT 265BHS (previous: 2015 23RB Passport Elite, ProPride)
2015 F250 XLT SB Crew, 6.2l gas
PullRite 16K SuperGlide w/SuperRail
Reese 5th Airborne (bagged) Pin Box
RoadMaster Shock Kit
X-Factor Cross Bracing
|
|
|
|
|
04-29-2016, 03:49 AM
|
#18
|
|
Senior Member
Join Date: Jan 2011
Location: Austin, Tx
Posts: 1,910
|
This mod should be on everyone's list. Once you see some photos of shackles almost worn out, you'll cringe. I used the Dexter kit, but they are probably about the same. The original shackles are stamped out of 1/8" steel, while the ones in the kit are around 3/8" thick. Once the cheap nylon bushings are worn through, the destruction of the shackles begins immediately, and this happens within just a few thousand miles. Serious stuff. Failure of these components could cause you to lose the suspension on your rig.
__________________
2011 Outback 277RL
2013 F250 XLT Crew Cab 6.2L
Bitter Gun Owner
Bitter Clinger
Armed Infidel
|
|
|
|
|
04-30-2016, 02:50 AM
|
#19
|
|
Senior Member
Join Date: Aug 2012
Location: Adelaide, South Australia
Posts: 123
|
MorRyde Wet Bolt Kit Install
Thanks for sharing your method and photos.
I was going to use Never Fails but after reading posts about wet bolts decide on them instead.Due to shipping cost to Australia (A$100) at the time I decided to try Wet Bolts with thicker nylon bushings that are normally used here. The Aussie supplier said there was never any problem with this combination. I had new springs made as well (US ones were stamped 'China') that accommodate the larger bushings. Also have a full length second leaf included to 'catch' the spring pack should the main on snap.
I found the centre Lippert 'Trail Air' rockers had non lubed bronze bushings so also replaced with wet bolts. I also used thicker slightly longer shackle plates similar to the MoreRyde but they needed relieving for max travel at the rocker.
All bolts were removed with a large G-clamp & socket for spacer. Wet bolts were forced in with a hammer & socket or a G-clamp & socket.
I've given the Never Fail's I was intending to use to my friend so it will be interesting to compare the performance of the two.
Cheers
Jon
|
|
|
|
|
04-30-2016, 03:30 AM
|
#20
|
|
Senior Member
Join Date: May 2015
Location: Near Saratoga Springs,
Posts: 1,131
|
Great thread with lots of good information. It's a a very appropriate, timely thread for me as my MorRyde wet bolt kit is waiting for a few nice days in a row. I did a similar Dexter wet bolt mod to our previous 5er and all of the bushings looked like the first one you showed. I also cross drilled the grease hole to ensure that there was good distribution plus installed easier to access angled grease fittings since Dexter provided some (most of them!!) that would not pass lube even free of the bolt.
|
|
|
|
|
|
| Thread Tools |
|
|
| Display Modes |
 Linear Mode Linear Mode
|
 Posting Rules
|
You may not post new threads
You may not post replies
You may not post attachments
You may not edit your posts
HTML code is Off
|
|
|
|
 » Recent Threads
 |
|
|
|
|
|
|
|
|
|
|
|
|
|
|
|
|
|
|
|
|
|
|
|
|
|
|
|
|
|
|
|
|
|


