 |
 05-21-2017, 09:28 AM
|
#1
|
|
Senior Member
Join Date: Sep 2015
Location: Austin, TX
Posts: 834
|
Fill Hole in Gray Tank
My weekend trip got cut short. Yesterday, I noticed some water dripping from the coroplast on the left side. I opened the coroplast to peak in. I finally figured out that the factory put a self tapping screw in a bad place. There's a strap that goes across the belly to hold the gas line for the water heater. In the middle of the strap, Keystone decided to put a self tapping screw to hold the gas line. The gray tank sits on top of the self tapping screw. Over time the screw slowly wore into the tank.
To fix, I plan to cut a square in the coroplast and use some type of epoxy on the tank. Then I will place a bolt downward. Are there any suggestions on epoxy? Also, how should I adhere the coroplast that I cut out? Thanks.
__________________
(SOLD) 2015 Keystone Passport 2810BH
2013 Ram 1500 Hemi 8-speed 3.92 Air Suspension
|

|

|
|
05-21-2017, 10:36 AM
|
#2
|
|
Site Team
Join Date: Mar 2011
Location: Gaylord
Posts: 26,995
|
Most RV holding tanks are made of "rotocast polyethelene". Two part epoxy, JB Weld, etc won't stick to the plastic tank for any length of time. You'll need a type of repair patch material that will stick to/bond with the tank material.
There are several "tank repair kits" available, some that are sold in auto supply stores won't work. My advice is to go to an RV dealership and get the correct repair kit and just do it once. As for replacing the screw on that gas line support. The gas line is black iron and doesn't necessarily "have to be supported" at that specific location. I'd look for an alternate location a foot or so away from that strap and the tank. Any screw that you install "pointed down" is going to have enough of a "rise" to rub through the tank over time with the vibrations encountered during travel. I'd stay away from anything that would or could cause tank damage in that area.
Here's one example of the tank repair kit: http://www.pplmotorhomes.com/parts/c...ank-repair.htm
ADDED: As for how to cut into/repair the coroplast: Cut a "three sided square" leaving the front side (as the trailer travels) as a hinge. Pull down on the hinge to access the area above the coroplast. Once the repairs are complete, wipe the surface of the coroplast with alcohol and use Gorilla Tape (by brand name) to seal the three cut edges. It's more or less a permanent repair, but you can access the area by removing the tape or by cutting through it, using the original cut line and then repair again using more Gorilla Tape.
__________________
John

2015 F250 6.7l 4x4
2014 Cougar X Lite 27RKS
|
|
|
|
|
05-21-2017, 11:06 AM
|
#3
|
|
Senior Member
Join Date: Sep 2015
Location: Austin, TX
Posts: 834
|
For the kit in your link, can you cut it to size?
Thanks for the help and info.
__________________
(SOLD) 2015 Keystone Passport 2810BH
2013 Ram 1500 Hemi 8-speed 3.92 Air Suspension
|
|
|
|
|
05-21-2017, 12:17 PM
|
#4
|
|
Senior Member
Join Date: Jul 2013
Location: Box Elder
Posts: 2,908
|
I repaired our grey tank last year using a Plast-Mend kit. Our tank is made from ABS, and hasn't leaked since I made the repair. http://www.plasti-mend.com/
__________________
Bob & Becky
2012 3402 Montana
2012 Chevy 2500HD D/A CC
|
|
|
|
|
05-21-2017, 12:48 PM
|
#5
|
|
Site Team | Emeritus
Join Date: Jan 2014
Location: Western PA
Posts: 2,732
|
Quote:
Originally Posted by bobbecky

I repaired our grey tank last year using a Plast-Mend kit. Our tank is made from ABS, and hasn't leaked since I made the repair. http://www.plasti-mend.com/ |
What type repair did you do? Stress crack, rub hole, pipe connection separation, or ???
__________________
2013 RAPTOR 300MP w/Rear Patio Deck NO Folding Side Ladder 
2013 Silverado 3500HD LTZ CC LB 4X4 DRW
Duramax 6.6L Turbo Diesel; Allison Trans
Reese 20K; Carlisle Radial Trail RH/HD; TPMS (12 Tires)
Veteran 

PSU (GO LIONS) 
|
|
|
|
|
05-21-2017, 01:04 PM
|
#6
|
|
Senior Member
Join Date: Sep 2015
Location: Austin, TX
Posts: 834
|
The plasti-mend website states this, "Plasti-Mend plastic repair products will not work on non-solvent reactive plastics such as polyethylene or polypropylene".
I did find TAP Poly-Weld: https://www.tapplastics.com/product/...d_adhesive/435
__________________
(SOLD) 2015 Keystone Passport 2810BH
2013 Ram 1500 Hemi 8-speed 3.92 Air Suspension
|
|
|
|
|
05-21-2017, 01:06 PM
|
#7
|
|
Site Team
Join Date: Jul 2014
Location: Modesto
Posts: 20,337
|
Those repair kits work as long as you follow the directions CLOSELY. Clean is key, scuff surface and knead the two parts good. You only have a few minutes to work the epoxy before it starts to harden.
__________________

2012 Copper Canyon 273FWRET being towed by a 1994 Ford F350 CC,LB,Dually diesel.
Airlift 5000 bags, Prodigy brake control, 5 gauges on the pillar.Used to tow a '97 Jayco 323RKS.
Now an RVIA registered tech. Retired from Law enforcement in 2008 after 25+ yrs.
|
|
|
|
|
05-21-2017, 01:15 PM
|
#8
|
|
Member
Join Date: Apr 2017
Location: Okmulgee
Posts: 51
|
I keep a tube of "shoe Goo" handy for these type of things. May not work for all things but it definitely does the job on polyethylene. Just used some black Shoe Goo to re-seal the poly under belly cover where I had to cut in to install my JT strong arm brackets.
__________________
-Dave
TV - 2013 Toyota Tundra TSS 4x4 5.7L
TT - 2017 Keystone Outback Ultra Lite 293UBH

|
|
|
|
|
05-21-2017, 04:59 PM
|
#9
|
|
Senior Member
Join Date: Jul 2014
Location: Solomons
Posts: 3,874
|
Quote:
Originally Posted by mfifield01
My weekend trip got cut short. Yesterday, I noticed some water dripping from the coroplast on the left side. I opened the coroplast to peak in. I finally figured out that the factory put a self tapping screw in a bad place. There's a strap that goes across the belly to hold the gas line for the water heater. In the middle of the strap, Keystone decided to put a self tapping screw to hold the gas line. The gray tank sits on top of the self tapping screw. Over time the screw slowly wore into the tank.
To fix, I plan to cut a square in the coroplast and use some type of epoxy on the tank. Then I will place a bolt downward. Are there any suggestions on epoxy? Also, how should I adhere the coroplast that I cut out? Thanks.
|
Since I have the same rig, can you measure from the side and tell me how far in that clamp is? I'm trying to make sure I don't have the same issue in work on mine. Thanks.
Sent from my iPad using Tapatalk
__________________
Tom
2019 Alpine 3651RL
2016 F350 CC DRW
|
|
|
|
|
05-22-2017, 06:52 AM
|
#10
|
|
Senior Member
Join Date: Sep 2015
Location: Austin, TX
Posts: 834
|
Any thoughts on the Poly-Weld vs the repair tape?
It's in storage right now. I will measure it when I head out to repair it.
__________________
(SOLD) 2015 Keystone Passport 2810BH
2013 Ram 1500 Hemi 8-speed 3.92 Air Suspension
|
|
|
|
|
05-23-2017, 04:51 PM
|
#11
|
|
Senior Member
Join Date: Jul 2013
Location: Box Elder
Posts: 2,908
|
On my repair, it was a stress crack along a molded rib on the bottom of the tank, aggravated by insufficient support of the tank bottom. I used the Plasti-mend with the screen fabric in the kit. After making the repair, I added a couple more braces across the frame of the trailer and used 1/2 inch foam panel to make blocks of varying thicknesses to support the tanks, grey and black, between the braces and the bottom of the tanks. The braces new and original, are spaced about 12 inches apart. I glued them to the bottom of the tanks with silicone caulk, then re-installed the coroplast and then the braces. I can now travel with any amount of fluid in those tanks, if needed. I did use a piece of 2 X 4 as a block also.
crack in the v shaped rib

repair along with the extra braces and blocking

__________________
Bob & Becky
2012 3402 Montana
2012 Chevy 2500HD D/A CC
|
|
|
|
|
05-24-2017, 06:27 AM
|
#12
|
|
Senior Member
Join Date: Sep 2015
Location: Austin, TX
Posts: 834
|
I ordered the repair tape yesterday. I contacted the manufacturer about application. They said the surface should be clean and smooth. I thought I should rough it up, but I'm glad I contacted them.
__________________
(SOLD) 2015 Keystone Passport 2810BH
2013 Ram 1500 Hemi 8-speed 3.92 Air Suspension
|
|
|
|
|
06-19-2017, 07:36 AM
|
#13
|
|
Senior Member
Join Date: Sep 2015
Location: Austin, TX
Posts: 834
|
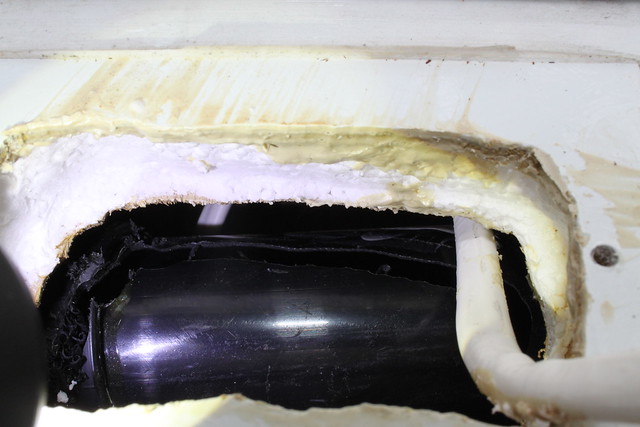
I repaired my tank over the weekend. I used acetone to clean up the area and coroplast. The self tapping bolt that went in to the tank happened be located just below a ridge in the tank. I wanted to bolt the holding bracket away from the tank, but the tank runs the width of the TT. I bolted it downward away from ridge. There's a good 1/2 - 3/4" between the bolt and tank, with the ridge sitting on the metal strap. Basically, it would be very difficult for the bolt to come in contact with the tank. I didn't measure the location, but can on Thursday. To check for interference, you wold need to cut into the coroplast. Position probably doesn't matter.
__________________
(SOLD) 2015 Keystone Passport 2810BH
2013 Ram 1500 Hemi 8-speed 3.92 Air Suspension
|
|
|
|
|
06-19-2017, 01:01 PM
|
#14
|
|
Senior Member
Join Date: Jul 2014
Location: Solomons
Posts: 3,874
|
Thanks for the detailed pictures. This will help.
Sent from my iPad using Tapatalk
__________________
Tom
2019 Alpine 3651RL
2016 F350 CC DRW
|
|
|
|
|
06-23-2017, 12:19 PM
|
#15
|
|
Senior Member
Join Date: Feb 2015
Location: Texas
Posts: 1,090
|
Quote:
Originally Posted by mfifield01
My weekend trip got cut short. Yesterday, I noticed some water dripping from the coroplast on the left side. I opened the coroplast to peak in. I finally figured out that the factory put a self tapping screw in a bad place. There's a strap that goes across the belly to hold the gas line for the water heater. In the middle of the strap, Keystone decided to put a self tapping screw to hold the gas line. The gray tank sits on top of the self tapping screw. Over time the screw slowly wore into the tank...
|
"Gee what could possibly go wrong if I put a screw right here?"
I went through a similar thing, getting ready for our inaugural trip, checking all the systems, I noticed water coming out through the floor, under the fridge. Turns out whoever roto-zipped the hole for the outside electrical outlet, zipped right through the drain line for the kitchen sinks, the leaking water ruined the control board of the furnace 
I believe no 2 trailers are built the same.
Glad you got it fixed, thanks for sharing.
-Brian
__________________
2014 Bullet Premier 22RBPR - let the camping commence!
2013 F150 Platinum - 5.0 - 3.55 ELD + towing package
|
|
|
|
|
06-27-2017, 06:10 PM
|
#16
|
|
Senior Member
Join Date: Jul 2014
Location: Solomons
Posts: 3,874
|
Quote:
Originally Posted by mfifield01
My weekend trip got cut short. Yesterday, I noticed some water dripping from the coroplast on the left side. I opened the coroplast to peak in. I finally figured out that the factory put a self tapping screw in a bad place. There's a strap that goes across the belly to hold the gas line for the water heater. In the middle of the strap, Keystone decided to put a self tapping screw to hold the gas line. The gray tank sits on top of the self tapping screw. Over time the screw slowly wore into the tank.
To fix, I plan to cut a square in the coroplast and use some type of epoxy on the tank. Then I will place a bolt downward. Are there any suggestions on epoxy? Also, how should I adhere the coroplast that I cut out? Thanks.
|
I crawled under mine tonight and pulled the self tapping screw out. Cut the coraplast so I could inspect mine for a hole. It was not all the way through but there was a significant divot in the gray tank from the self tapping screw on the clamp. A bolt facing outward with a piece of closed cell foam between the bolt and tank are now in place. Thanks for the heads up on this before it became a leak. I'm sure there are other 2810s out there that have the same issue.
__________________
Tom
2019 Alpine 3651RL
2016 F350 CC DRW
|
|
|
|
|
 Posting Rules
|
You may not post new threads
You may not post replies
You may not post attachments
You may not edit your posts
HTML code is Off
|
|
|
|
 » Recent Threads
 |
|
|
|
|
|
|
|
|
|
|
|
|
|
|
|
|
|
|
|
|
|
|
|
|
|
|
|
|
|
|
|
|
|


 Linear Mode

